Showing posts with label 1929 Bungalow. Show all posts

Monday, March 11, 2013

The Before & The For Now...My Diningroom


About a year after I moved into my house my Dad came to help me with a little garage shingling project.  It was so great of him to drive the 4 hours to mend a little leak…in my garage roof.  Nothing critical but it sure is nice to be able to leave my sunroof open inside now.  My dad is retired but spent the majority of his working life as a carpenter so he really knows how things are supposed to go when it comes to DIY projects.

I am a bit more of a I want it done and I want it all done now kind of project manager.  This leads me to often have a few too many projects started at once.  And yes, I got the what for from my Dad about not starting something new until I finish my current project.  At the time it was the kitchen cabinets, dining room walls, new stairs, bathroom wainscoting , and a couple of other small projects I can’t exactly remember at the moment.

So it’s been a few years since that visit and I am still working on many of these projects including my dining room.  I’m a bit of a perfectionist so have been reluctant to share it until it was totally complete & perfect.  I’m not there but in an effort to embrace imperfection I have decided to share :).

There are so many things I still want to do but I just haven’t decided on fabrics, colors or themes.  So in the interim I’ll give you the before and the “for now” photos.

Apologies for the absolute horrible photo - this is from the listing from
before I purchased.

When I moved in the floors were beautiful….but that was about it.

There was this pineapple wallpaper….EVERYWHERE…it covered the diningroom, the kitchen, the hall, the back entry, the stairway and even the basement stairwell….I’m not kidding.

Phone photo from the walk through with my agent.  This is the view into my livingroom - you can see the now
on my livingroom here

I get the desire to create a unified flow but this was ridiculous.

The old fashioned shades & window a/c certainly make a design statement don't they?

So down it came…and luckily for me it was a really thick vinyl paper that was not well adhered to the wall so it literally peeled right off in sheets.

And the other side of the room looks into the kitchen and behind that lovely door
are stairs to the 2nd floor.  You can see in the first photo that the stairs were covered
in a lovely neon green low pile carpet.

I had painted my livingroom in a taupe-y brown color (Benjamin Moore’s Truffle) and thought that maybe a nice light aqua-y blue would be lovely since there is an open archway between the rooms.  Blue and brown are complimenting colors right?

First try...not quite.  Apparently I was in the middle of hanging the sheers when I took this pic.

Well, once I got the blue up I liked it alright but was stuck in what color to paint my kitchen (the next room).  I didn’t want rainbow brite’s house and my bedroom was pink at the time so what to do…
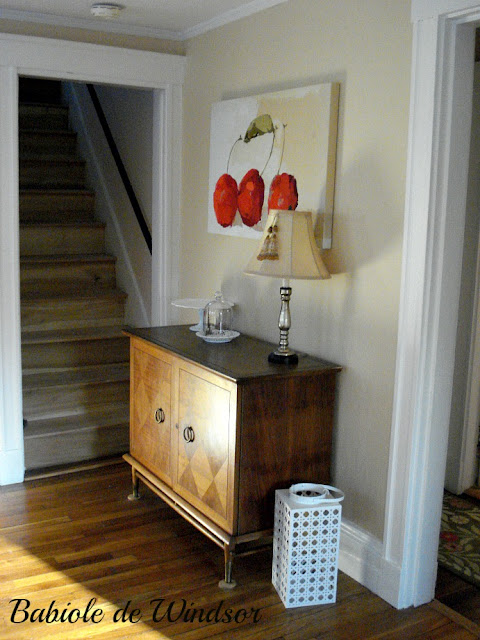
The door is now gone as is the neon green carpet.  Stairs still need to be finished
but they sure do look better already

Within a month of getting the blue up I repainted a more neutral color – Benjamin Moore’s Handmade.  It’s a really warm golden beige (think manila folders with a gold tint) and just makes the white woodwork pop.

The chandelier has been replaced and the window a/c unit is long gone

Turned out just the perfect neutral for my little 1929 bungalow.

Looking through from my kitchen all the way into my livingroom.  The colors make sense to
me here.  You can also still spy a little bit of that pineapple wallpaper behind my china
cabinet...for now

I have 3 windows in this room but it’s not a particularly bright room so while I love, love, love drapes I’m worried adding them to the room will darken the room too much so I’ve stuck with white sheers for now.

I’m still contemplating the drape thing but for now it’s just the sheers.

The kitchen is going to get a major makeover (probably not this year) but you can see a little peak here...you like that flooring don't you?

I also am still vacillating on wall art..the space over the desk needs a little something but I haven’t hit on the right thing…yet.  I love all of the plate walls I am seeing these days and there are so many inspiration pics on Pinterest….maybe that’s the answer.


Will keep contemplating for now and keep you all updated as I experiment.


Monday, January 21, 2013

Well Hello: Entry Chest in Provence

One of the things that made me instantly know that my house was the one was all of the custom built-in’s…really they had me at laundry chute.

You also may recall from my one of my very first posts (or you can check out the before & after here) the wonderful built-in that is in my livingroom:


Livingroom Built-in

Well, in my front entry is a built-in chest that is not only functional (perfect for boot removal in the winter) but also has great lines.  Of course I didn't realize until looking through my house photos I really didn't have a good before shot so hopefully you all can get the basic gist from the not so great pics below.

The Before

When I moved in it wasn’t so cute though…stained in a 1970’s dark walnut color it just wasn’t my cup of tea.  That coupled with the peanut butter colored walls can you say brown overload?


Up Close before - yes it really was this sad.  Plus it had a huge water mark on the top from a plant I might
possibly have over watered :)

I thought it was really a great place to add a pop of color and bring some life to the entry.  As usual I have spent far too many hours contemplating what would be the absolute perfect color…red, hot pink, green, yellow…they all could be fabulous in just the right shade.


Primed & ready to add some color - I primed before I decided to go with the Annie Sloan Chalk Paint

So, a quick painting of the walls the same beige as the exterior, the wainscoting & trim a glossy beautiful white certainly helped but the chest was still a bit sad.
After so much contemplation I finally just decided that I needed to plunge in and try something.  It’s just paint right so I can always change it with another coat - so I went with a light green/yellowish color that ended up being for sure what I wasn't was looking for (proven by the fact that I totally forgot to photograph it).  


How's this for an inspiration piece - I loved this chest in a "discount" furniture outlet - $600!!  Still love it.

So while out looking for something I'm sure I didn't need one day I found the piece above at a beautiful furniture outlet.  This was one of those specialty decor places where everything is pretty pricey but I love to go to for inspiration.  I loved the blue Provence Annie Sloan chalk paint I used on my bedside table (you can check my table out here) so why not?


The After...I'm loving the color...now just have to do something with that not so
cute carpet.

Another angle....the doorway leads into my livingroom

Turns out I didn’t need to spend all of that energy over thinking this project...I had the color all along (go figure).  I thought about doing a fancy paint treatment but it turns out I love the blue  just as it is – just the right pop of color for my little bungalow.  

What do you think – should I have gone with the hot pink?

Linking to:  Between Naps on the Porch, The Dedicated House, The Charm of Home, Jennifer Rizzo, Coastal Charm, Beyond the Picket Fence, Saavy Southern Style

Sunday, November 11, 2012

Summer Project Update - Finished!!!


So it’s been months (and months…and months) in the works but finally my summer project is FINISHED!  If I knew then what I know now….yeah, not sure I would have taken this project on. 

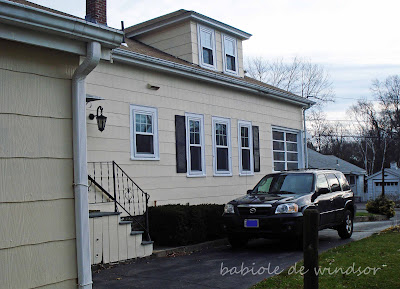
Side view - this was taken on inspection day

Side view - this was taken today
 
Back Steps..sad
 
Back Steps...now.  Long term plan is to move this door to the back of
the house and put a window here instead

It wasn’t hard….really.  But it definitely took more time than I had anticipated…that darn trim work…

Garage before...bonus room on the side is a future project

Garage now...what you can't see is the addition of a garage door opener...
very important for New England winters

There are several more exterior projects that just didn't get done this year but this was a huge step forward.

Front Door...before

Front door now...still needs a major reno (i.e. new door,
new steps & portico) but a little paint will make do till
spring

With all of the challenges (like me getting on the roof to paint the dormers?) and the frustration of it taking far longer than I wanted, it was so worth it.  I am very pleased with how it came out and definitely house proud these days. 

Front view before

Front view after - was going to paint the brown shutters but after taking them
down I decided it was a better plan just to replace them

Next up….guestroom redo.  Here’s the before:

This is the photo from the listing when Mrs Johnson still owned (and
decorated) the house.

Friday, October 26, 2012

2012 Summer Project Update - Dormers Done


Have you ever started part of a project and immediately had the thought….oh no this really wasn't a good idea?

Well, that was what was shouting in my head after I had decided that there was no good reason I couldn't or shouldn't get up on my roof to paint the dormers to my house.  I painted the sides up to the roofline without any issue what’s a few more feet right?  Well, knees shaking I quickly figured out what a few more feet were…my tipping point.

Two-toned house...not really what I had in mind...

So off the roof I came with only about 1/3 of one side of one dormer painted…fail.

At least I tried right?  And I learned my limitations without breaking my neck…it’s all good except my dormers were still peanut butter brown and my house was a pretty yellowy cream….crap.

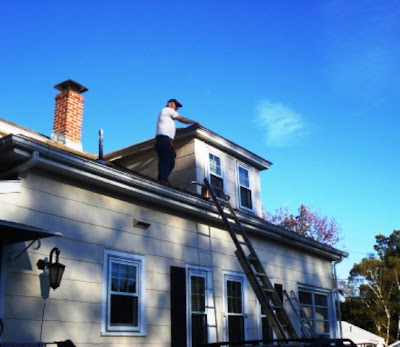
So last week I got some help from my mother’s husband who drove 1 ½ hrs with his big kids ladder to spend the day finishing them up for me.  Holy cow they look so good.  Thanks Butch...appreciate it more than you know.

Butch up on the roof..he makes it look so easy

Roof acrobatics courtesy of Butch....no way are you catching me in this
pose.. oh and that's my 1/2 painted garage workshop to the right (a
future project that will be so wonderful to finish inside...maybe next year).

And one step closer to this project being done.

Dormers done...I think I lost the "ladder war" though...mine looks
so undersized next to Butch's.

Just the trim to finish now…

Scraping the trim...this week's goal is to finish
it...I think that's a doable goal.

Thursday, October 18, 2012

2102 Summer Project - Update


It’s been several weeks now since I first told you about my “what was I thinking 2012 summer project” (you can see the beginnings of it here).  Progress is now reached that snail’s pace with Fall in New England bringing shorter days and so many other fun things to distract me.  Although slow,  progress is still progress, right?

Just a quick reminder of the before color - this is the side of my house
(the window air conditioner unit is long gone)

So most of the house is painted – just one more coat on the far side and I’m done with the “easy” part.  Next comes trim and I have finally accepted that as much as I think I can do anything getting, on that roof to finish the dormers just isn’t in my future.

My backdoor - long term plan is to move this door to the back of my house
but for now it's still on the side (and it's now black).

In the spirit of full disclosure though, on bright Saturday morning a couple of weeks ago I did get up on the roof and gave it the good old college try.  Started the painting but was a bit too distracted with my knees shaking to stay up and finish what I had barely started.  I might have been up on that roof maybe 3 minutes before I headed back down the ladder…at least I tried right?

Getting there..(take special notice of the little white cottage next to my house).
Weather permitting trim & shutters are on the agenda for this weekend

The good news is help is coming soon to take care of those pesky dormers.

Funny story:  My neighbors have all been very interested in what is going on at my house this summer as I’ve been outside working (in a very non-nosey non-intrusive kind of way of course – I have great neighbors!).  My neighbor Jay whose little cottage home is the white one right next to mine has been sharing with me his plans for all kinds of DIY projects for a while but hasn’t had a chance to really start anything since I’ve lived next to him (MBA + busy schedule can do that to you).

I hadn’t seen Jay much this summer but one day I was enjoying a quick cup of coffee before getting going on my painting and something flying past my window caught my eye – a piece of siding from his house.  I saw the siding but didn’t see Jay so all I could think was “crap is it that windy out that his siding is blowing off”?  I know, seems like such a blond thought…did I mention I had just started my morning coffee?

Well, it wasn’t the wind – it was Jay.  Apparently me spending days on end painting my house had “shamed” him into action and he decided to finally take the not so attractive vinyl siding off his house and put up the cedar shingles he had been planning since he bought the house 6 years ago.  Glad I could offer up the inspiration Jay :-)

And...Jay's "what was I thinking" project.

Well, I still have the “what was I thinking” mantra going through my head but I that light at the end of the tunnel is starting to appear (although admittedly it’s still a bit dim).  Will keep pushing toward it!

Sunday, September 9, 2012

2012 Summer Project...Sneak Peak


Sometimes when I am in the middle of a HUGE project I wonder what I was thinking when I decided it was a good idea to take such project on.  

My peanut butter colored 1929 bungalow....before
This is the case at this time when I am in the middle of the project I decided to take on for this summer.  I am well over 2/3 done but with much of the detail work left to do it feels like it will never be completely done.

Here’s a sneak peak at my project midway in…

Paint glides right on the asbestos shingles

Scraping done, painting begun
 I'm still trying to figure out how to get to the dormers to get them painted (climbing on the roof didn't really work out so well for me).

What was I thinking?

Monday, March 28, 2011

A Room with Another View..

It has been so nice to hear all the positive comments on my blog so far.  There have been quite a few requests for more pictures though so here you go….
Here is my inspiration room.  I loved the sophisticated color of Sara’s room but as I mentioned I just couldn’t get there with the match so I went with another neutral that I am truly happy with.  I so love Sara’s room in its entirety (especially the sofa) but I did not want my room to be quite as feminine so her room is truly an inspiration room – my goal was not to simply copy it but infuse some of her elements into my style.  I stole her accents of red idea – a color choice I never would have added on my own and it really does bring some punch to both of our rooms.


This is the front side of my room before:

It’s hard to see but, there was a built-in wooden valance above the windows.  The afternoon of day I closed on the house I left the lawyers office and drove directly to my new house.  One of the first things I did that afternoon was to remove the valance (and the hundreds of screws holding it up) and take the very dusty curtains down.  I left the window shades in place for privacy until I had decided on what I was going to install for blinds.  My room stayed that way for a while – a good long while during which I tested paint sample after paint sample….
These are the front windows now:

I have installed wood blinds in the rest of my house so I was a bit concerned about installing the cellular shades here but I really wanted the ability to close the blinds for privacy yet open them wide to let the light in.  This room gets tons of sun so I really wanted to let it shine in.
I don’t seem to have any before pictures of the other side of my living room but I am confident given the other pictures I have shared you can easily imagine the before shot.  Here is the after:


The door is my front door and there is a small vestibule between it and the outdoors – it was a faded brown color when I moved in kind of like baking chocolate that has been sitting too long and has that white coating. Not attractive!  My first plan was just to replace the door with a French door but I was a bit concerned with the lack of privacy as well as keeping heat in during those cold winter months here in Boston. 
So, while mulling my door issue over I happened upon a picture in a Serena & Lily catalog (love, love, love their linens) that gave me the inspiration to do something similar to my door. 


I have to say I love it now, I never thought a little paint would make such a difference but it really does help balance the window on the opposite wall (from last post picture).
So, that’s the finished product in its entirety.

Monday, March 21, 2011

One Room Down...

Ok, so I bought a little bungalow house 2 ½ years ago that while needing some serious updating was structurally a solid as one could ask for of a 1929 house.  Now, when I say it was like walking into 1972 I am not exaggerating even a little bit.  It was clean and well cared for but gold, green & brown were EVERYWHERE!  The kitchen, 2nd floor hall & basement had gold cabinets and woodwork, there was green & gold pineapple wallpaper in the kitchen, dining room and hallways (yes plural) and the carpet in the living room was seriously 1970's brown (although I think it was fairly new).  I knew this house would be charming when done but I also knew it would take a lot of elbow grease to get there.  The only real tragic room when I moved in was the bathroom and while I have done quite a bit of work on the bathroom it is not quite finished yet. 
Well, this weekend a momentous event passed – I finished my first room where it is actually fully complete.  I can’t believe it, from the 13 sample paints I purchased (my walls looked like a patchwork quilt for months) to pulling up the carpet, it’s done.   Yes 13 paint samples,   I do realize that is nuts but as I mentioned in my prior post I am a bit obsessive and couldn’t quite get the color right. A few years ago, I had seen a beautiful picture in Southern Living of Sara Blakely’s oh so elegant living room (for those who may not know, she is the creator of Spanx) and was obsessed with knocking it off.   I was aiming for this warm taupey-champagne color but after my 11th sample that wasn’t even close ended up scrapping that plan and went with Benjamin Moore Truffle instead. 
I painted walls, ceiling, door, woodwork, removed the decorative window shell, installed crown molding, pulled carpet, buffed floors, laid a new area rug (another story all together – not so easy to put down a 100 pound rug by yourself and get it straight…), removed a custom wood valance and heavy dated drapes and installed new blinds, hung pictures and had to figure out furniture placement in a very odd shaped room (10x20).  All in all, I am very pleased with the finished product.
So, now I can sit back and relax in my totally refurbished living room right???  Unfortunately, not so much.  8 more rooms to go….luckily I do have most of these rooms are in various stages of renovation so hopefully the next one will be completed soon.  Dining room completion is right around the corner…
For now here are the before and after of my livingroom:
Before:
After: